This post may contain affiliate links, which means I’ll receive a commission if you purchase through my links, at no extra cost to you. Please read full disclosure for more information.
This post is all about Gingerbread nails.
Are you ready to add some sweetness to your holiday look? Can a simple nail design really capture the essence of the festive season?
The answer lies in the rising popularity of DIY nail art during the holidays. Gingerbread nails art is a trending topic, with many creative designs shared. You can join in on the fun by creating your own holiday nail designs that are both festive and unique.
With a few simple tools and some creativity, you can achieve a festive nail art look that’s sure to impress. Whether you’re a seasoned nail artist or a beginner, the world of DIY nail art is full of possibilities. Get ready to explore your creativity and make this holiday season one to remember!

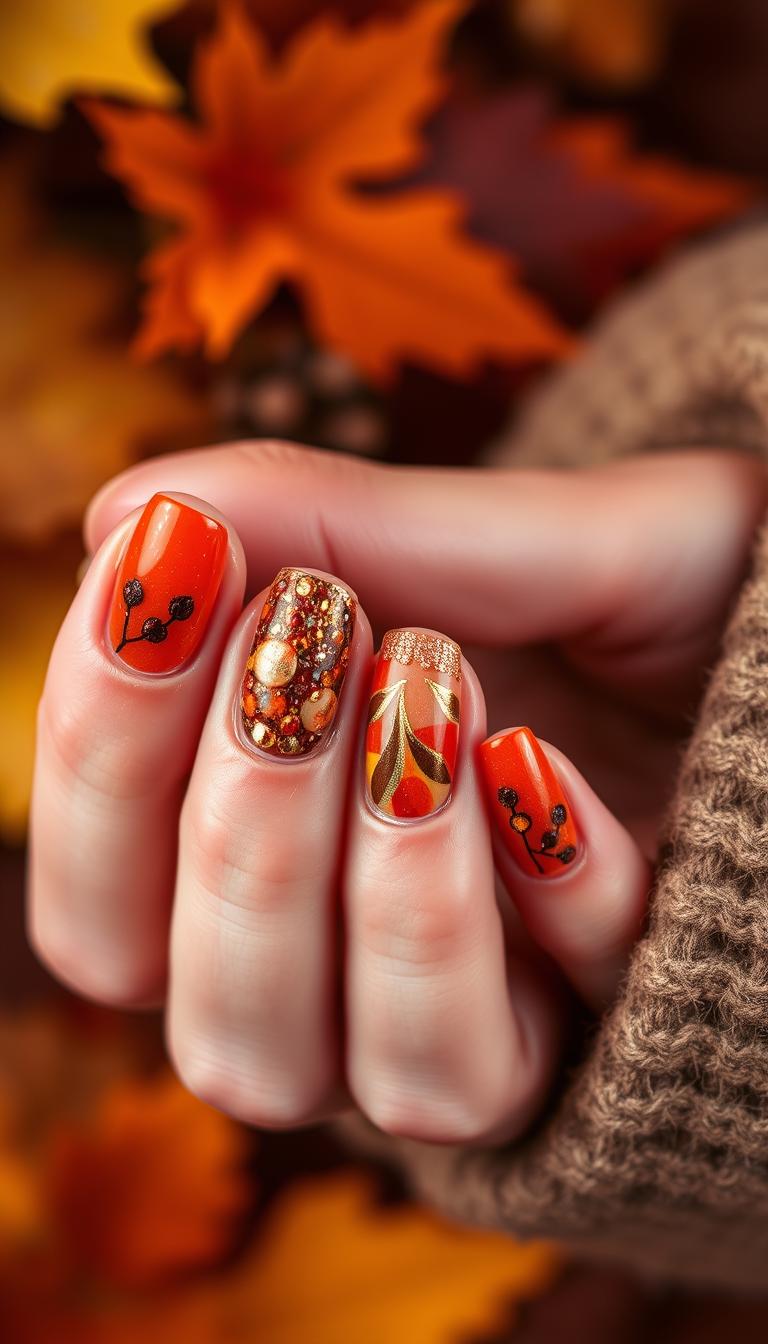
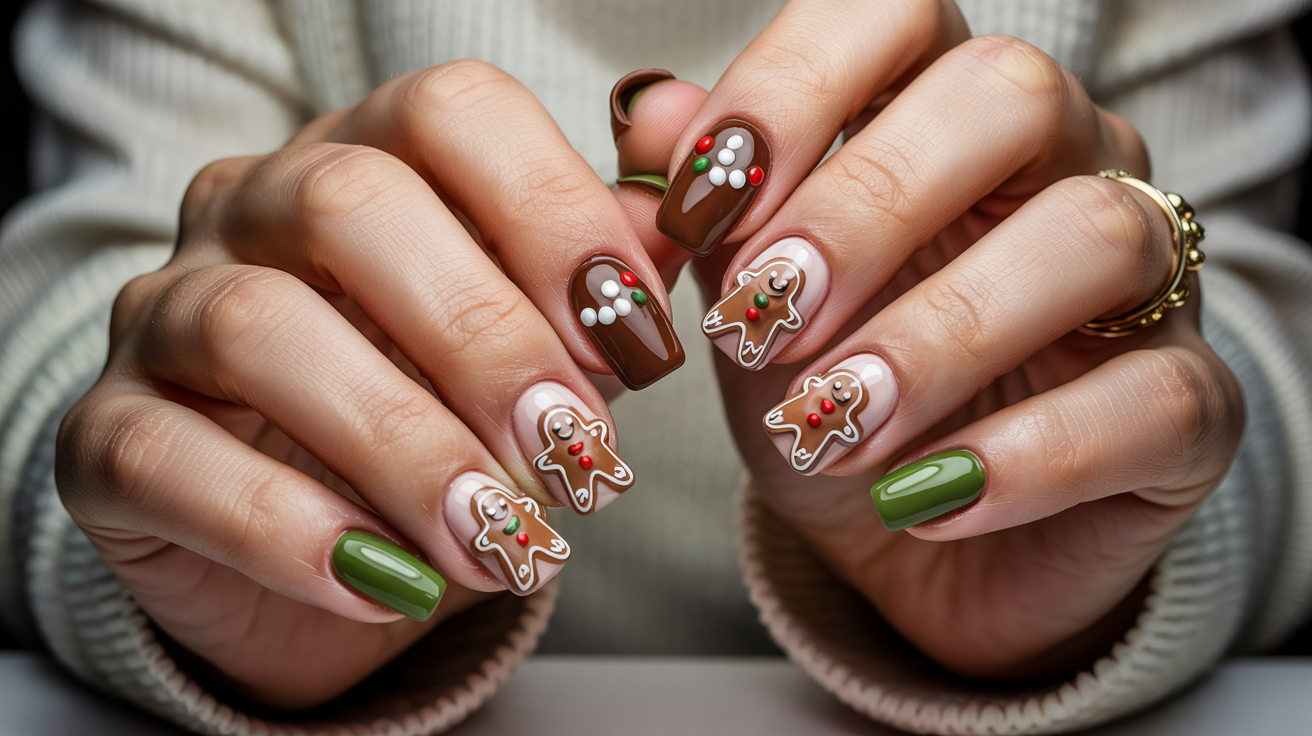
To get the authentic gingerbread look, use warm, rich colors like browns, creams, and whites. Add red and green for a festive touch. Metallic or glitter polishes can add a luxurious finish to your nail art.
To get perfect holiday nail designs, start with well-prepared nails. Good nail prep makes your nail art look great and last longer. A smooth nail surface is key for detailed designs, like gingerbread-themed nail art.
First, clean your nails to remove oils or residue. Use a nail buffer to shape your nails and make the surface smooth. This step is vital for your nail polish to stick well and your art to stay in place. Proper nail prep techniques are key to long-lasting nail art, as they help prevent chipping and smudging.
Applying a base coat is essential for your nail art. Choose a high-quality base coat that nourishes your nails and provides a good foundation for your polish. For detailed work like gingerbread designs, use a white or neutral base coat. This makes your colors pop and gives your designs a professional look.
By following these steps, you’ll create a beautiful and long-lasting holiday nail design. It will be the perfect finishing touch to your festive look.
Classic Gingerbread Man Accent Nail
Start with a simple yet adorable design: the classic gingerbread man accent nail. This look is perfect for those new to nail art or looking for a quick, festive touch.
Step-by-Step Tutorial
Begin by painting your nails with a base color of your choice. For a traditional gingerbread look, opt for a warm brown shade. Use a dotting tool or a small nail art brush to create the gingerbread man’s face and buttons. Add details like icing and candy buttons using white or red polish.
Variations to Try
Experiment with different expressions on your gingerbread man or add a holiday hat for extra festivity. You can also change the background color to match your holiday outfit or preferences.
Charming Gingerbread House Pattern
Create a whimsical gingerbread house pattern on your nails for a more detailed design. Use a combination of brown, white, and red polishes to mimic the look of gingerbread and icing.

Festive Gingerbread Cookie Border Design
Add a border of gingerbread cookies around your nail for a fun and festive look. This design works well with a simple background color, allowing the gingerbread cookies to be the focal point.

Whimsical Candy Buttons and Icing Details
Enhance your gingerbread nail art with whimsical candy buttons and icing details. Use a small brush or dotting tool to add these cute elements to your design.

Mini Gingerbread Village Scene
For a more elaborate design, create a mini gingerbread village scene on your nails. This can include multiple gingerbread houses, trees, and even tiny snowmen.

Gingerbread Sweater-Inspired Pattern
Bring the cozy feel of a gingerbread-themed sweater to your nails with a sweater-inspired pattern. Use a combination of brown, white, and red to create a festive and cozy look.

3D Gingerbread Embellishments
To create 3D gingerbread embellishments, you’ll need special tools and materials. Start by applying clear polish or nail glue with a dotting tool or toothpick. Then, shape the material into gingerbread men or candy buttons with a fine brush.
For more detailed designs, use acrylic powder or gel to build up the 3D structures. This technique takes practice but is worth it. You can also mix different materials for unique textures and effects.

Incorporating Holiday Glitter and Rhinestones
No holiday nail art is complete without sparkle. Add festivity to your gingerbread designs with holiday glitter or rhinestones. Apply clear polish, then sprinkle glitter on top.
For a dramatic effect, use rhinestones or large glitter particles as a focal point. Experiment with layering different glitter types or combining with other techniques for a stunning look.

Essential Tools and Materials for Creating Festive Nail Art
To make stunning gingerbread nail art, you need the right tools and materials. Having the right supplies makes the process easier and more fun. This way, you can get professional-looking results at home.
First, get a good quality base coat, nail polish remover, and a nail art brush. You’ll also need a dotting tool or a toothpick for small details. Investing in a nail art kit that has these basics is a good start for beginners.
For detailed gingerbread designs, use specialized tools like nail guides or stickers. They help you get clean lines and precise shapes. A nail stamp or a small dotting tool can create detailed patterns and textures, adding depth to your design.
Perfect Color Combinations for Festive Gingerbread Designs
Choosing the right colors is key for festive gingerbread nail designs. The perfect palette brings warmth and joy, making your nails special.
Classic brown and white is always a winner. It reminds us of fresh gingerbread cookies. Use brown for the base and white for icing and candy details.
Add holiday red and green for a festive touch. Use these colors for accents like holly or candy canes. They contrast beautifully with brown and white.
Try metallic colors for a modern twist. Metallic gold or bronze adds luxury, while rose gold is softer. Use metallic polish for accents or as a base for a stunning look. Try holographic or chrome finishes for extra depth.
With the right colors, your gingerbread nail design will be festive and stylish. Whether you choose classic or modern, your nails will be a holiday hit.
Troubleshooting Common Nail Art Challenges
Starting your gingerbread nail art journey might bring up some common issues. But don’t worry, these can be fixed with the right tips. Whether you’re new to nail art or have been doing it for a while, knowing how to solve these problems is essential for a perfect finish.
Smudges and design errors can be annoying. But, there are easy fixes. For smudges, use a cotton swab with nail polish remover to fix the spot. For bigger mistakes, a nail art cleanup brush can help fix them without messing up the whole design.
Dealing with thick or fast-drying polishes can be hard. But, there are ways to make it easier. To thin thick polish, add a few drops of nail polish thinner. For fast-drying polishes, work fast and use a wet base coat to help the polish spread smoothly.
To keep your gingerbread nail art looking great all holiday season, start with a strong base coat. Then, finish with a durable top coat. Try not to use your nails as tools and wear gloves for household chores to prevent chipping. Regular touch-ups will also keep your design looking fresh.
By following these troubleshooting tips, you can overcome common nail art challenges and enjoy long-lasting, festive designs.
Embracing the Joy of DIY Holiday Nail Art
As the holiday season ends, keep the festive spirit alive with DIY nail art. Gingerbread nails and other holiday designs are a fun way to celebrate. Now, you have the skills to make stunning holiday nail art that shows off your style.
DIY nail art is all about trying new things and showing who you are. Don’t hesitate to try out holiday glitter or royal icing effects. It’s a great way to connect with others, whether online or at parties.
Keep practicing your DIY nail art skills. Try out different designs, like gingerbread nails, and enjoy the process. With each new design, you’ll get better and your holiday nail art will become a big part of your celebrations.