This post may contain affiliate links, which means I’ll receive a commission if you purchase through my links, at no extra cost to you. Please read full disclosure for more information.
This post is all about Simple Christmas Nails.
Are you dreaming of stunning Christmas nail designs but worried you lack the skills of a professional nail artist? What if creating festive holiday nails could be easier than you ever imagined?
This holiday season, forget complicated nail art techniques that require professional training. Our collection of 17 simple Christmas nail designs proves that anyone can create gorgeous, festive manicures right at home. Whether you’re a complete beginner or just short on time, these easy nail designs will help you look perfectly polished without stress.
From classic red and green combinations to trendy minimalist looks, these Christmas nail designs require nothing more than basic polish, a few tools, and a touch of creativity. You’ll discover techniques that transform ordinary nail polish into extraordinary holiday statements – no salon appointment needed.

Key Takeaways
- Simple Christmas nails can look professionally done
- No advanced skills required for festive nail art
- Designs range from classic to contemporary styles
- Home manicures can be quick and impressive
- Minimal tools needed for stunning results
Why Simple Christmas Nails Are Perfect for the Holiday Season

The holiday season is full of parties, family gatherings, and shopping. Who has time for complex DIY Christmas nails? Simple holiday nail art is your secret to looking great without spending hours at the salon.
Busy people adore festive manicures that can be done in 30 minutes or less. These quick designs save time and are easy to fix if a nail chips. This keeps your look fresh and festive.

- Save money on expensive salon visits
- Create designs in under 30 minutes
- Minimize the risk of mistakes
- Look stylish with minimal effort
You don’t need to be a nail art expert. Simple Christmas nail designs are for everyone. Using holiday colors, small details, and sparkly finishes can make basic nail polish look amazing.
The best part? These designs are totally in style. You’ll look chic at parties, family gatherings, and events without spending hours on them. Your DIY Christmas nails will be both comfy and perfect for Instagram.
Essential Tools and Polishes for DIY Holiday Nail Art
Creating stunning Christmas nail polish designs is easy and affordable. You don’t need to be a pro or spend a lot. Just a few tools and colors can turn your nails into festive masterpieces at home.

To start your holiday nail art, gather the right tools and pick the perfect polish colors. The best part? Most supplies are cheap and easy to find.
Basic Nail Polish Colors You’ll Need
Your holiday manicure should have these colors:
- Classic red (bright and deep burgundy)
- Forest or emerald green
- Crisp white for snowflakes
- Metallic gold or silver
- Nude or pale pink base color
- Bonus: Glitter polish for instant sparkle

Helpful Tools for Creating Easy Designs
Make your nail art stand out with these tools:
- Base and top coat for long-lasting color
- Nail dotting tool set (or bobby pins/toothpicks)
- Striping tape or thin brushes
- Nail stickers and stamps
- Cotton swabs for precision cleanup
You don’t need to spend a lot or buy high-end supplies. Many drugstore polishes are great for festive designs. They’ll impress your friends and family.
Classic Red and Green Christmas Nail Ideas

Red and green are the top Christmas colors that bring the holiday vibe. They make your nails stand out with just a little effort.
Make your nails pop with festive designs using these easy steps:
- Alternate solid red and green nails for a bold statement
- Use red as a base with green accent nails (or reverse)
- Design color block patterns mixing red and green
- Add gold glitter for extra holiday glamour

For a professional look, pick deeper burgundy and forest green. For parties, go for bright cherry red and emerald green. Adding one green accent nail can make a big difference.
These colors are super versatile. You can keep it simple or go for detailed designs. Red and green always add that festive flair.
Festive French Manicure Variations for Christmas
French manicures are back in style for Christmas, with fun twists on the classic look. Want to make your Christmas nails stand out? These festive ideas will turn your French tips into something magical.
Holiday nail trends focus on elegance with a bit of sparkle. The French manicure is ideal for showing off your festive spirit without going overboard.

Reverse French Tips with Holiday Colors
Try a reverse French manicure for a chic holiday look. Here’s how to do it:
- Start with a nude base coat
- Paint the nail base with deep green or rich gold
- Draw a curved line near the cuticle for a fancy touch
This look is both professional and playful, perfect for holiday parties and work events.

Glittery French Tips for Extra Sparkle
Make your French manicure sparkle with glittery tips. Here’s how to add some holiday sparkle:
- Begin with a classic rosy red or soft nude base
- Apply glitter polish at the nail tips
- Spread the glitter toward the edge for a big impact
Tip: Use striping tape to keep your glitter tips clean and sharp. Your nails will shine at every holiday event!

Simple Christmas Nails Featuring Candy Cane Stripes
Turn your nails into a festive holiday statement with candy cane nails. These easy Christmas nails are great for adding holiday cheer to your manicure. Striped nail designs inspired by candy canes are simple, even for beginners.
Begin with a white base coat. Once it’s dry, use a thin red polish or striping brush for diagonal stripes. Don’t aim for perfection. Slightly uneven stripes give your design a charming, handmade look.
- Choose a bright white base color
- Use red polish for traditional candy cane stripes
- Experiment with pink for a softer, whimsical look
- Create stripes on one or two accent nails
Want to add more flair? Try these creative ideas:

- Add small silver glitter dots to represent sugar crystals
- Pair candy cane nails with a simple snowman design on an accent nail
- Mix in a pastel color palette for a modern twist
The beauty of candy cane nails is their versatility. You can keep most nails solid white or red. Show off the striped design on just one or two fingers. This makes the look easy and quick, perfect for the busy holiday season.
Easy Snowflake and Winter-Themed Nail Designs
Winter nail art turns your nails into a canvas of seasonal creativity. Snowflake nails bring magic to the cold season with stunning designs. They are perfect from December to February.
Creating beautiful winter-themed nails is easy, no matter your skill level. Snowflake designs add frosty elegance to your look.

Using Nail Stickers for Effortless Snowflakes
Christmas nail stickers make snowflake designs easy and professional. They make winter nail art fun for everyone.
- Choose a smooth base color like white, pale blue, or soft gray
- Apply nail stickers carefully on dried base polish
- Seal with a clear top coat for long-lasting shine
Hand-Painted Snowflake Techniques
Hand-painting snowflake nails adds a personal touch. Start with a thin brush or toothpick for delicate designs.
- Begin with a clean, solid color base
- Paint a small cross or asterisk shape
- Add tiny branch-like lines extending from the center
- Finish with small dots at line ends
Pro tip: Remember that no two snowflakes are identical in nature, so embrace the uniqueness of your hand-painted designs!
Santa Hat and Holiday Character Nail Art
Turn your nails into a festive canvas with cute holiday character nail designs. These designs are easy to make and don’t need professional skills. Just a little creativity and some basic techniques are all you need.

Start with the classic Santa hat design, perfect for festive nails. It’s easy to do:
- Paint your nail in a crisp white or red base color
- Add a curved white line for the hat’s fur trim
- Create a small white dot for the Santa hat’s pompom
Holiday character nails can also be fun with snowman designs. These designs are great as accent nails. They let you show off your creativity without overwhelming your whole manicure.
For a simple snowman nail, try these steps:

- Use white polish to create three stacked circles
- Add tiny dot details for eyes and buttons
- Use an orange dot or triangle for the carrot nose
The secret to great holiday character nails is to keep the design clean and easy to spot. Don’t worry about making it perfect. These playful designs are meant to make you smile and spread holiday cheer!
Minimalist Holiday Nail Designs with Maximum Impact
Minimalist Christmas nails are perfect for those who love elegance without fuss. These simple designs show that you can make a big impact with just a few touches. The secret is in the nail art that speaks volumes with simplicity.
Your accent nail designs can turn a simple manicure into a holiday wonder. Minimalist nail art is all about simplicity and flexibility. With clean lines, soft colors, and smart details, you can achieve a look that’s both stylish and fun.

Single Accent Nails with Festive Details
Here are some ideas for single accent nails:
- Paint most nails in a neutral nude or soft white base
- Add a festive touch to your ring finger with:
- A tiny metallic Christmas tree outline
- Delicate gold or silver glitter stripe
- Miniature snowflake in white or silver
These minimalist Christmas nails are great for work while keeping the holiday vibe alive. Less truly is more in creating a chic nail look that celebrates the season without being too much.
Glitter and Sparkle Toppers for Instant Holiday Glam
Want to make your holiday nails pop? Glitter nails are the quick way to add festive flair. Sparkle nail polish can turn any manicure into a party look.
Adding glitter to your nails is easy. Here are some simple steps to add holiday sparkle:
- Apply a full glitter topcoat over a solid color for instant sparkle
- Create a glitter gradient by concentrating sparkle at nail tips
- Design an accent nail with full glitter coverage

Choosing the right glitter is key. Pro tip: Use thin layers for smooth application. A good top coat seals the glitter and prevents rough textures.
Color choices are important for your glitter look. Gold and silver are classics, while multicolored glitter is fun. Try different colors to find your holiday nail look.
Glitter is easy to work with. No need for perfect skills—just enjoy the shine and your festive nails!
Plaid and Sweater-Inspired Christmas Nail Art
Winter manicure ideas get a cozy upgrade with plaid nails and sweater-inspired designs. These festive nail art styles bring the warmth of the holiday season to your fingertips.
Creating plaid nails is easy. You can turn your winter manicure into a festive masterpiece with a few simple steps:
- Start with a solid base color like deep green or classic red
- Use thin striping brushes to create vertical and horizontal lines
- Experiment with contrasting colors for a bold look

Creating Plaid Patterns with Nail Polish
Sweater nail designs are simpler than you think. Start with a base coat in a neutral tone like cream or soft gray. Use a thin nail art brush to create intersecting lines that mimic classic plaid patterns. Pro tip: Allow each layer of color to dry completely before adding the next set of lines.
Cozy Sweater Textures Using Nail Stamps
Nail stamps are a game-changer for winter manicure ideas. They can instantly add a cozy sweater texture to your nails. Look for stamps with cable-knit or Fair Isle patterns to create an instant winter wonderland on your fingertips. Mix and match stamps with solid colors for a truly unique holiday look!
Whether you’re a nail art novice or a seasoned pro, plaid nails and sweater-inspired designs offer a playful way to celebrate the holiday spirit. Your nails will look like they’ve been wrapped in the coziest Christmas sweater imaginable!

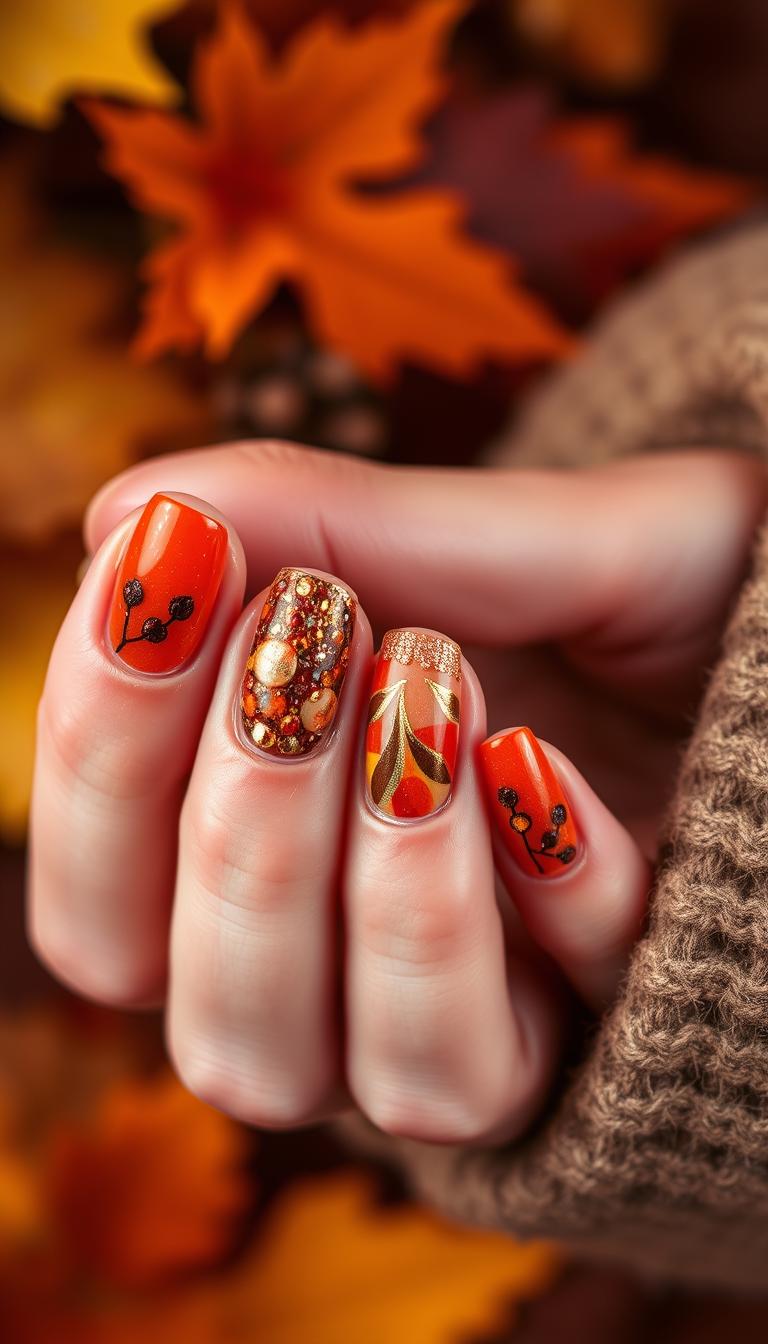
Holly, Mistletoe, and Botanical Holiday Designs
Make your holiday nails special with elegant botanical Christmas designs. Holly nail art adds a classic touch, perfect for holiday parties. It makes your manicure look sophisticated.
Start with simple yet stunning designs that celebrate nature’s beauty. Try these festive nature designs to make your nails stand out:

- Holly Berry Accent Nail: Paint delicate green leaves with bright red berries
- Mistletoe-Inspired Tips: Create subtle green branches with tiny white dots
- Minimalist Poinsettia Design: Soft white petals with gentle green accents
The secret to amazing holiday nail art is simplicity. You don’t need to be a pro to create beautiful botanical Christmas nails. Use a thin brush or toothpick for delicate leaf shapes and small berry clusters. A white or neutral base is best for showing off these natural designs.
Pro tip: Pick a color palette that matches your holiday outfit. Soft greens, deep reds, and crisp whites are timeless. Your holly nail art will be the talk of every holiday party!
Conclusion
You’ve explored a world of simple holiday manicure designs. These designs show that anyone can make festive nail art at home. You can find something for every skill level and style.
These festive nail ideas are very flexible. Whether you’re new to nail art or have some experience, there’s something for you. Start simple and get more confident with more complex designs.
Nail polish is easy to change and doesn’t last forever. So, feel free to try new things. Your holiday season is a great time to show off your creativity with your nails. With basic tools and polishes, you can make your nails look like tiny holiday scenes without spending a lot.
Get into the DIY spirit and make nails that show off your personality. This holiday season, your hands will tell a story of fun, creativity, and joy. One nail at a time.